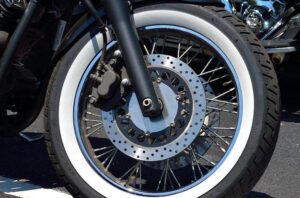
Your motorcycle engine runs smoothly thanks to oil as a lubricant. Your bike would come to a complete stop without it. One of the best ways to keep your motorcycle in good condition is to change the oil. It ensures a consistently smooth ride by preventing important parts and components from rubbing up against one another. Use this comprehensive guide to learn everything you need to know about changing the oil if you’re new to riding or unsure how to do it, so you can ride off into the sunset without endangering your engine.
What Does It Mean to Change Your Oil?
To produce power, every car engine needs oil. Oil is used for two things: cooling and lubrication. It facilitates lubrication as the parts and elements rub against one another. Transferring heat away from the contact surface also cools the engine.
The type of oil that motorcycles use differs from that used in automobiles. Motorcycles need a certain level of friction to operate, whereas standard vehicles use oil with friction modifiers to reduce friction between parts and components. The unique formula is used in the oil used in motorcycles in order to protect the parts and components. As the oil lubricates the wet clutch to enable the transfer of power to the drivetrain, it helps maintain the proper balance rather than reducing friction. The clutch will fail to engage and cause slippage if the friction falls below a predetermined threshold. To lubricate the engine without letting go of the clutch, the oil should be sufficiently slick.
Your motorcycle’s oil won’t last forever, though. It will eventually stop lubricating the components in your engine as a result of becoming dirty and less slippery. Metal shavings and other small particles from inside the engine can be absorbed by the oil. Changing the oil entails removing the old, soiled motorcycle oil and replacing it with brand-new, clean motorcycle oil. Additionally, the engine will be flushed out to remove any debris.
Why You Should Regularly Change Motorcycle Oil?
We’re referring to engine oil, also known as case oil, which helps to cool your engine and prevent rust by lubricating the internal moving parts and reducing friction. When you change your oil, i.e. when you flush the system, the oil can also wash debris from your engine parts down to the bottom of the case. metal shavings or particulates that shed during normal operation or during part failure.
Your engine’s oil loses viscosity with use and time, particularly when it is put through a lot of work. Additionally, it becomes soiled as the engine runs, collecting the particulate matter. We replace the oil and inject new blood for this reason.
The frequency of oil changes for motorcycles varies depending on the manufacturer and the vintage motorcycle enthusiast. My favorite online Norton owners’ club advises changing the oil in my 1964 Atlas every 1,500 miles using mineral oil rather than synthetic. Regarding my 200-cc two-stroke Vespa Rally from 1978, I always change the case oil before a ride that will cover more than 500 miles over several days. That means I replace it roughly three times per year.
Ducati recommends changing the oil every 7,500 miles for my 2013 Ducati 848, which I consider to be a brand-new motorcycle since it is less than 10 years old. However, other riders I’ve talked to think it’s preferable to remove the old oil every 2,500 to 2,500 miles. What I’m trying to say is that depending on the motorcycle’s make, model, and year of manufacture, the frequency of engine or case oil changes will change. To figure out the best schedule, check the owner’s manual for your bike, contact the manufacturer’s parts division, or speak with other club members.
How Often Should You Change Motorcycle Oil?
The best thing to do if you are unsure of how often to change the oil in your motorcycle is to consult the user manual. If you misplaced your manual, you can also look for it online. Keep in mind that your oil has no set expiration date and adhere to the manufacturer’s instructions.
While each bike is unique, many riders agree that changing the oil every 2,000 miles or twice a year is the best practice. Like most topics in the industry, not everyone concurs on this one. Others may advise changing your oil every 3,000 miles or once a year. These are only rough estimates, and there are a lot of things to take into account, so be sure to do some research on your particular make and model for more details.
What Happens If You Don’t Change Your Motorcycle Oil?
When you don’t change the oil on time, you’ll inevitably encounter various problems while driving. Although you might not initially notice them, these problems will eventually start to harm your bike’s internal parts. Due to their tardiness in changing their oil, many riders have had to pay thousands of dollars in repairs.
You should be aware of the indicators that your bike needs an oil change, as well as what happens when your bike completely runs out of oil.
Oil will start to lose its lubricating and cooling properties if you run out or if you keep using dirty oil. Eventually, the pistons will fuse with the cylinder walls after continuing to heat up. The engine seized as a result of this. The piston connecting rods, crankshaft, and valves, all of which are prone to breaking, will eventually become affected by the issue, which will then spread to other engine components. These components will also begin to develop carbon deposits, which could cause long-lasting harm.
Your motorcycle might still start even without oil, but make sure to add oil as soon as you can.
Signs Your Engine Needs An Oil Change
If you haven’t covered the necessary mileage, don’t assume your oil doesn’t need to be changed. Watch out for these indicators that your motorcycle requires oil:
- – Low Dipstick: Since many motorcycles lack oil gauges, you’ll need to use a dipstick to determine the level. You’ll need to change the oil if there isn’t any oil on the stick or if the level is too low.
- – Vibrations that are excessive: If your motorcycle is vibrating more than usual, particularly at high speeds, it may be a sign that there isn’t enough oil in some of the metal parts, which is causing them to bang against one another.
- – Loud Sounds: You’ll probably also hear it if these parts are banging against one another. Listen for sounds of grinding, screeching, and banging.
- – Temperature rise: The engine will become overheated in the absence of oil. More oil may be required if the bike is running hotter than usual.
- – Engine Seizure: The engine may freeze completely while you’re riding if it seizes up. Typically, this occurs when the oil supply is low or nonexistent.
Your bike might also have additional problems. Other cautionary signals that your bike needs repairs can be heard. Your engine may be burning through oil more quickly than usual for some other reason, or your oil system may be leaking. For a better understanding of what’s happening in the engine, listen to your motorcycle if you use Bluetooth motorcycle speakers.
Everything You’ll Need To Change Motorcycle Oil
Many of these are things you’ll need for a ton of motorcycle maintenance, so they’re definitely worth the money. Before beginning your oil change, take a look at this list.
Tool List
- Your first source of information should be the owner’s manual for your specific motorcycle. If you’re anything like me and prefer older motorcycles that have lived full rich lives, chances are the owner’s manual was stolen long ago by garage rats or a slack glovebox door. The fact that so many car and motorcycle maintenance manuals have been made available online means that this is not a problem. Many are even free to use. You should spend a few dollars even if it’s not free to get access to the care and feeding manual for your particular two-wheeler.
- Wrenches: You’ll need them to remove and replace any body panels as well as the oil drain plug and oil filter. To remove the oil filter, you might also require a strap wrench. Make sure to check to see if your motorcycle has SAE or metric standard hardware.
- Dish with magnets for hardware. You’re going to thank me for this one. It’s a lifesaver. Also, under no circumstances should tiny bolts, nuts, or screws be placed on a shop towel. There will be many expletives uttered as you watch those significant shiny bits fly to the four winds after you spill something and quickly grab the towel to wipe it up. Don’t ask me how I know, please.
- Paddock stand or lift if there is no center stand. To change the oil, the motorcycle needs to be upright and stable. For this job, the side stand won’t do.
- Depending on where the oil-filler hole is located, you might want to look for an offset funnel or just make one of those paper jobs that the old parts shops used to give you for free.
- You should choose an oil collection pan that is low profile so that it can fit under the motorcycle and that can hold the oil from several changes so that you don’t have to lug it to an oil-recycling facility every time you change the oil.
- I use Scott blue paper towels that I purchased. Unlike the useless brown rolls of paper you find in truck stop bathrooms, these paper towels are much stronger and have less lint. They are also very absorbent and quickly clean up any shop spills. They won’t go bad, so pick up a large box of them.
- Use gloves to avoid damaging your manicure. Disposable nitrile gloves have a good grip for shop work and will keep your paws clean. Additionally, they are free of latex and powder.
- hand cleaner with pumice lotion. You’ll still get dirty even if you wear gloves and use shop towels. I like Fast Orange.
- Make your bike shine like new with Motul’s Wash & Wax, the best motorcycle cleaner. Simply spray Wash & Wax on the body panels, seat, and even the glass and chrome, and then buff with a soft, clean microfiber cloth once you’re finished changing the oil in your motorcycle.
Parts List
- The recommended weight and type of engine oil can be found in the owner’s manual.
- washers or gaskets for the filler and drain plugs. Use only the most recent ones. Spend your pennies on new washers and gaskets.
- Knowing the proper size for your bike’s oil filter is essential, especially if it needs to fit under the bodywork.
A job well started is half done, according to the legendary chore master Mary Poppins. The Greek philosopher Aristotle, I believe, said it first. Although neither of them ever had the opportunity to raise a leg over the saddle of a Yamaha YZF-R3, they are both correct: The best way to start the task of changing the oil in your motorcycle is with proper preparation.
A flat work surface, like a driveway or the floor of a garage, is also necessary. You’ll probably be sitting or even lying on the ground in this location unless you have a motorcycle lift, so it needs to be protected from both pedestrian and vehicle traffic.
How To Change Motorcycle Oil?
Make sure you have the following items available before you begin:
- Check your owner’s manual for the proper grade and suggested volume of motorcycle oil.
- Replacement oil filter
- Drain Plug washer
- Socket wrench
- Torque wrench
- Drain pan
- Oil filter remover tool or filter wrench
- Funnel
- Rear paddock stand (if your bike lacks a centre stand)
- Protective gloves
- Rags
Step 1: Warm Up The Engine
- Alternatively, you can ride your bike for five minutes after starting your car and letting it idle for ten minutes.
- Put the bike on its stand after it has warmed up and wait a few minutes for the oil to settle.
Step 2: Drain The Oil
- Track down the drain bolt on your motorcycle.
- Put your drain pan underneath the bolt; pay attention to the flow direction as a lot of oil may shoot out quickly!
- With the socket wrench, slowly and not all the way, unscrew the drain bolt.
- By hand, unscrew the drain bolt and take out the plug. The oil will start to flow out, so try to hold on to the plug.
- Let the oil drain.
Step 3: Replace The Filter
- Use the filter removal tool or filter wrench to unscrew the filter.
- ” paraid=”1947703221″>If there is any extra oil in the filter, pour it into the pan.
- cleaning The Filter Seal Requires Using A Rag.
- the Sealing O-ring On Your New Filter Should Be Coated With A Small Amount Of Fresh Oil.
- by Hand, Tighten The Filter Until The O-ring Touches The Seal; Do Not Tighten It Any Further Than This Point To Avoid Damaging The Seal.
step 4: Replace The Drain Plug
- ” paraid=”1965848961″>Replace the washer after thoroughly cleaning the drain plug.
- ” paraid=”204803916″>The drain plug should be snugly torqued.
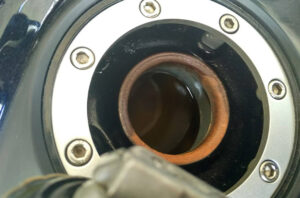
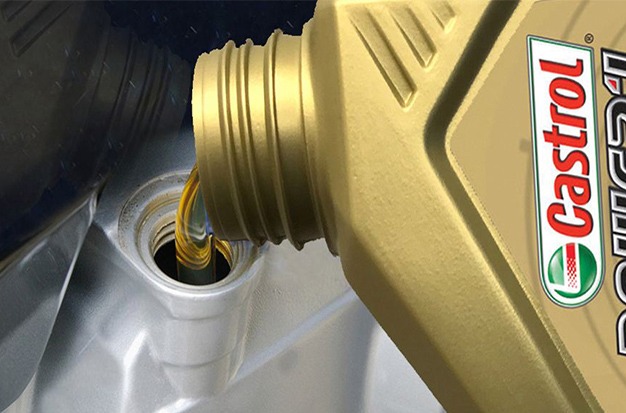
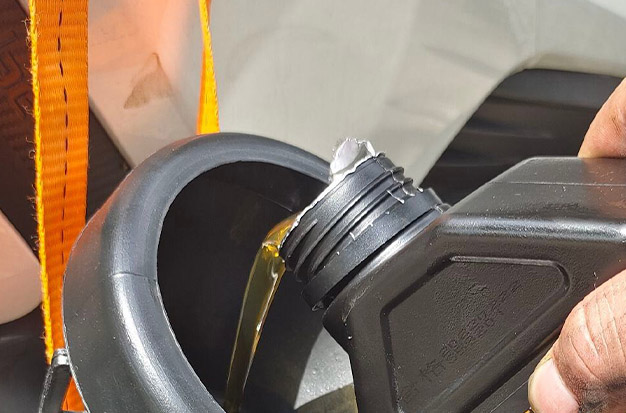
Step 5: Top Up The Motorcycle Oil
- Locate the oil fill intake, unscrew the top, and insert a funnel.
- Add the oil gradually while using a dipstick or a sight gauge to monitor the oil level.
- Reinstall the intake top using the screws.
Step 6: Check Your Oil Level
- Idle the engine for five minutes after starting it.
- Check the oil level and top it off if necessary.
- Find your local oil bank here and responsibly dispose of the used oil.
Conclusion
Motorcycle oil keeps your bike’s engine and transmission parts operating safely and smoothly, but over time, it can accumulate deposits and other impurities, lose viscosity, oxidize, and lose its additives, necessitating an oil change.
We’ve answered questions about how frequently to change your motorcycle oil and how to spot low oil symptoms in this guide, along with detailed instructions on how to perform an oil change on a motorcycle while saving time and money. If you still have any inquiries, kindly leave a comment.